

Mixing grout might not seem like the most exciting part of a tiling project, but it’s one of the most important. Get it right, and your tiles will look amazing and stay put for years. Get it wrong, and you could end up with cracks, gaps, or worse—costly repairs. In this guide, we’ll walk you through how to mix grout for tile properly, including essential tools, expert tips, and common mistakes to avoid. By the end, you’ll have the confidence to achieve flawless grout consistency every time.
What Is Grout and Why Does Grout Consistency Matter?

Grout is a cement-like material used to fill the spaces between tiles, sealing joints and preventing moisture intrusion. Beyond its sealing role, the consistency of grout determines how easily it spreads and how durable it cures. If your grout is too watery, it’ll shrink and crack; too stiff, and it won’t adhere properly or might dry in clumps. Achieving the perfect grout consistency is crucial for both function and aesthetics.
Essential Tools and Materials for Mixing Tile Grout
Before you dive in, gather everything you need to streamline the process:
Grout (powdered or pre-mixed)
Water or grout additive
Clean bucket (free of residue)
Measuring cup or scale (for accurate ratios)
Mixing tool (margin trowel for small batches, paddle mixer for large jobs)
Sponge and cloth (for cleanup)
Having the right gear means less trial-and-error. It also helps maintain a consistent texture when you’re mixing grout, especially for larger areas.
Types of Grout: Powdered vs. Premixed
Powdered grout: Offers greater control over water-to-grout ratios, ideal for custom colors and large projects.
Premixed grout: Convenient for quick touch-ups and small installations but can be pricier.
Recommended Bucket, Paddle, and Measuring Tools
Use a bucket with a flat bottom and straight sides to reduce splashing. A drill with a paddle attachment speeds up mixing for mixing tile grout on big jobs, while a margin trowel works fine for tweaks and small patches.
Step-by-Step Process: How to Mix Grout Like a Pro
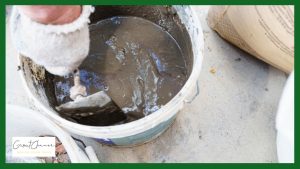
1. Prepare Your Workspace
First things first: make sure the area is clean and well-ventilated. Dust or debris can mess up the mix, and proper airflow helps grout cure evenly.
2. Measure Grout and Water
Check the manufacturer’s instructions—most recommend a 3:1 ratio of grout to water. For instance, if you have 3 cups of grout powder, add 1 cup of water. Weighing components on a scale (e.g., 3 kg grout to 1 kg water) is even more precise.
3. Mixing Techniques: Hand vs. Drill
Hand mixing: Great for small batches. Stir with a trowel until lump-free.
Drill mixing: Use a paddle on low speed. Pour grout first, then slowly add water in a steady stream while mixing.
4. Achieving the Right Consistency of Grout
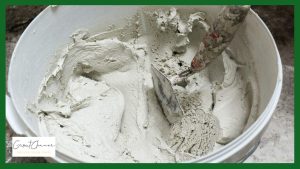
The ideal mixture should resemble creamy peanut butter or thick toothpaste—spreadable but not runny. If it’s too loose, add a bit more powder. Too thick? Splash in a teaspoon of water and remix.
5. Slaking: Why Resting the Grout Matters
Once mixed, let the grout “slake” for 5–10 minutes. This resting phase activates bonding agents and ensures uniform hydration. After slaking, give it a final stir before use.
Professional Tips to Ensure Perfect Grout Consistency
Use warm water in cooler temperatures to speed up setting.
Add a grout enhancer (latex additive) for improved flexibility in high-moisture areas.
Keep a spray bottle of water nearby to maintain workable consistency during longer jobs.
Check weather conditions: extreme heat or humidity can affect drying time.
Drawing on over a decade of tiling experience, I’ve seen how slight tweaks—like swapping to a polyurethane additive—can dramatically improve final results.
Common Mistakes When Mixing Tile Grout and How to Avoid Them
Over-watering: Leads to shrinkage and cracking.
Skipping slaking: Causes uneven curing.
Mixing too much at once: Grout hardens in the bucket.
Adding water after initial mix: Results in poor adhesion and color inconsistency.
Avoid these pitfalls by mixing manageable batches (no more than you can use in 30 minutes) and following precise ratios.
How to Mix Small Batches of Grout for Touch-Ups
When you only need a bit of grout—for a cracked tile corner or missing fill:
Use a small container like a plastic cup or bowl.
Maintain the same water-to-grout ratio, just scaled down.
Stir thoroughly to avoid lumps.
Leftover grout can be stored in an airtight bag for a few hours—just don’t try to revive hardened mix with extra water.
How to Store and Clean Up Grout Tools After Mixing
Clean immediately: Grout hardens quickly on tools.
Soak trowels and buckets in water for a few minutes, then scrub.
Store leftover powdered grout in a sealed, moisture-proof container—use within a month for best results.
How Thick Should Grout Be? Understanding Grout Consistency
Ideal grout should hold its shape on the trowel. If you scoop a bit up, it shouldn’t drip off, yet it must spread smoothly into joints. Think of it like frosting a cake—too runny and it slides off, too stiff and it tears the cake surface.
Advanced Additives and Grout Modifiers for Enhanced Performance
Latex Additives: Boost flexibility and adhesion—great for showers and outdoor areas.
Anti-Mold Agents: Help resist mildew in damp environments.
Color Sealing Additives: Maintain color consistency, especially in contrasting grout lines.
Environmental and Safety Considerations When Mixing Grout
Ventilation: Always work in an open area or use fans.
Protective Gear: Wear gloves, goggles, and a dust mask when handling powdered grout.
Disposal: Do not pour excess grout slurry down drains—let it solidify, then discard in trash.
Frequently Asked Questions (FAQs)
Q1. What consistency should grout be for tile?
Grout should have a creamy, toothpaste-like consistency—thick enough to stay on your trowel but spreadable into joints.
Q2. Can I mix grout in advance and store it?
You can slake for 5–10 minutes, then remix and use within 30 minutes. Beyond that, it’ll start setting and shouldn’t be stored.
Q3. How long should grout sit before application?
After mixing, let the grout rest (slake) for 5–10 minutes. Stir once more, then apply within the next 20–30 minutes.
Q4. Is it okay to add water to thicken grout after slaking?
No—adding water later dilutes bonding agents and can weaken the grout.
Q5. How much grout do I need for a small backsplash project?
Estimate grout volume by multiplying total joint area (length × width × depth) and adding 10% for waste. Many manufacturers provide calculators online.
Q6. What to do if grout becomes lumpy or dry too quickly?
If lumps form, discard the batch and remix using fresh powder. Always mix smaller batches in hot weather.
Conclusion: Mastering the Art of Mixing Grout for Tile
Mixing grout correctly—whether you’re mixing tile grout for a full bathroom or a quick touch-up—relies on precise ratios, the right tools, and professional techniques. By following this guide, you’ll consistently hit that ideal grout consistency, ensuring your tiles look flawless and stand the test of time. Ready to tackle your next tiling project? Grab your grout, follow these steps, and let your skills shine!