

Tile and grout cleaning is one of those household tasks that many people put off until it becomes impossible to ignore. Over time, dirt, grease, and moisture settle into the porous surface of grout lines, making even clean tiles look dull and unhygienic. The good news is that tile and grout cleaning doesn’t have to be complicated or expensive. With the right approach, a few basic tools, and effective grout cleaners, you can restore your floors and walls to their original shine without professional help.
In this guide, you’ll learn a simple, practical method broken down into five easy steps. These steps are designed for real homes, real messes, and real people—no complicated chemistry or expensive equipment required. Let’s get started.
Why Tile and Grout Get So Dirty
Before jumping into the cleaning process, it helps to understand why grout gets dirty so quickly. Unlike tiles, which usually have a smooth, glazed surface, grout is porous. This means it absorbs liquids, dirt, and bacteria easily. Kitchens collect grease and food residue, while bathrooms deal with soap scum, mold, and mildew. Over time, this buildup darkens grout lines and can even produce unpleasant odors. Regular mopping often isn’t enough because it tends to spread dirty water into grout lines rather than clean them. That’s why targeted tile and grout cleaning is essential.
To make it clearer, here are the main reasons grout gets dirty so fast:
- Porous surface – grout absorbs moisture, dirt, and spills quickly
- High foot traffic – floors collect dust, mud, and debris daily
- Grease and food particles – especially in kitchen areas
- Soap scum and moisture – common in bathrooms, leading to buildup
- Mold and mildew growth – develops in damp, poorly ventilated spaces
- Improper cleaning methods – mopping can push dirty water into grout instead of removing it
Understanding these factors helps you approach tile and grout cleaning more effectively and prevent future buildup.
Step 1: Prepare the Area Properly
Preparation is often overlooked, but it plays a huge role in effective tile and grout cleaning. Start by removing loose dirt and debris from the surface. Sweep or vacuum thoroughly, paying attention to corners and edges where dust accumulates. If you’re working in a bathroom or kitchen, clear the area of rugs, furniture, or any obstacles so you can clean evenly without missing spots.

Next, inspect the grout lines carefully. If you notice cracks or damage, remember that cleaning alone won’t fix those areas—they may need repair later. However, for normal dirt and stains, proper preparation sets the foundation for effective results. A simple but important tip: always test your chosen grout cleaner on a small, hidden area first to avoid discoloration or surface damage.
- Remove loose dirt before tile and grout cleaning to prevent mud formation during scrubbing
- Sweep or vacuum thoroughly to eliminate dust from grout lines and corners
- Clear the cleaning area completely for better access and even grout cleaning results
- Inspect grout lines for cracks or damage before applying any grout cleaner
- Choose the right grout cleaners based on tile type to avoid surface damage
- Test grout cleaner on a hidden spot to ensure safe and effective cleaning
- Work in small sections for more controlled and deep tile and grout cleaning
Proper preparation not only improves cleaning results but also reduces effort and protects your tiles from damage.
Step 2: Choose the Right Grout Cleaners
Not all grout cleaners are created equal, and choosing the right one can make a big difference. You don’t always need harsh chemicals—sometimes simple household solutions work just as well.
Here are a few effective options:
- Baking soda and water paste – gentle for regular cleaning
- Vinegar solution – useful for grease and grime (avoid on stone)
- Hydrogen peroxide mix – helpful for stubborn stains
- Commercial grout cleaner – best for heavy buildup
When selecting a grout cleaner, consider the type of tile you have. Natural stone surfaces require special care, while ceramic and porcelain are more durable.
Apply your chosen cleaner directly onto the grout lines and let it sit for a few minutes so it can break down the dirt effectively.
Step 3: Scrub with the Right Technique
This is the stage where you start to see real results from your tile and grout cleaning efforts. Once your grout cleaner has had time to sit and loosen the dirt, scrubbing helps lift that buildup out of the grout lines. You don’t need fancy tools—a simple stiff-bristled brush or even an old toothbrush can do the job, especially in tighter spaces.
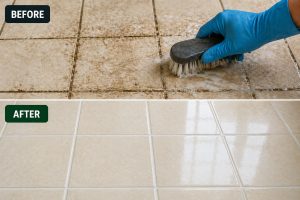
The key here isn’t applying more force, but using the right technique. Gentle, consistent scrubbing works far better than aggressive pressure, which can actually damage the grout over time. Work in small sections so you can focus properly, and use circular motions to pull dirt out from deep within the grout’s surface. If you come across stubborn stains, it’s better to repeat the process with your grout cleaner than to scrub harder.
Patience really matters in this step. Rushing or scrubbing too aggressively often leads to uneven results, where some areas look clean while others still appear dull. Taking your time ensures a more even and professional-looking finish.
To make this step easier and more effective, keep these points in mind:
- Use a stiff-bristled brush or toothbrush for precise grout cleaning
- Scrub in circular motions to lift dirt from deep within grout lines
- Work in small sections for better control and consistent results
- Reapply grout cleaner for tough stains instead of scrubbing harder
- Avoid metal brushes or harsh tools that can damage tiles and grout
- Maintain steady pressure rather than aggressive force
When done correctly, this step can completely change the look of your tiles, making the grout lines appear cleaner, brighter, and much closer to their original color.
Step 4: Rinse and Remove Residue
After all the effort you’ve put into scrubbing, this step ensures your tile and grout cleaning actually lasts. Rinsing is not just about washing away the cleaner—it’s about removing all the loosened dirt, grime, and leftover residue sitting on the surface. If this isn’t done properly, that residue can dry back into the grout lines and make them look dull again.
Use warm water along with a clean sponge or mop to gently wipe the area. Work slowly and make sure you’re not just spreading the dirty water around. It’s better to rinse in sections so you can control the process and see the results clearly as you go.
One common mistake people make is continuing to use the same dirty water. As soon as the water looks cloudy, replace it. Otherwise, you’re just reapplying grime back onto the tiles and grout you just cleaned. Clean water makes a noticeable difference in the final look.
After rinsing, take a dry cloth or towel and wipe the surface. This helps remove excess moisture and prevents streaks or water spots from forming on the tiles. It also speeds up the drying process and reduces the chance of new dirt sticking to damp grout.
To get the best results, keep these simple points in mind:
- Use warm water to rinse away grout cleaner and loosened dirt
- Clean with a sponge or mop without spreading dirty water
- Change the rinse water when it becomes cloudy or dirty
- Work in small sections for more effective tile and grout cleaning
- Wipe the surface with a dry cloth to prevent streaks
- Remove excess moisture to help grout dry faster and stay clean
A proper rinse might seem like a small step, but it plays a big role in making your tiles look fresh, clean, and residue-free.
Step 5: Dry and Seal the Grout
After completing the cleaning process, giving your grout enough time to dry is just as important as the cleaning itself. Moisture left behind in grout lines can lead to mold, mildew, and new dirt buildup much faster than you’d expect. Allow the area to air dry naturally, or speed things up with proper ventilation like fans or open windows.
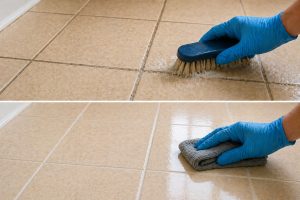
Once the grout is fully dry, applying a sealer is a smart final step. While many people skip this, it makes a big difference in long-term tile and grout cleaning results. A good grout sealer forms a protective barrier over the porous surface, helping prevent water, stains, and dirt from soaking in again. This means your grout stays cleaner for longer and future cleaning becomes much easier.
Sealing doesn’t make grout completely stain-proof, but it significantly reduces how quickly grime builds up. It’s especially useful in high-moisture areas like bathrooms and kitchens where grout is constantly exposed to water and spills.
To finish this step effectively, keep these points in mind:
- Allow grout to dry completely before applying any sealer
- Use proper ventilation to speed up the drying process
- Apply grout sealer evenly along the grout lines
- Let the sealer cure as per instructions for best protection
- Reapply sealer periodically to maintain long-term results
- Sealing helps reduce future stains and simplifies grout cleaning
Taking the time to dry and seal your grout properly ensures that all your effort pays off, keeping your tiles looking clean, fresh, and well-maintained for a longer time.
Common Mistakes to Avoid
Many people use too much water, which can push dirt deeper into grout lines. Others skip the waiting time for grout cleaners, reducing their effectiveness. Using the wrong cleaner for certain tile types can also lead to damage.
Another mistake is ignoring regular maintenance. Small, frequent cleaning sessions are far more effective than waiting until grout becomes heavily stained.
How Often Should You Clean Tile and Grout?
The frequency depends on usage. High-traffic areas may need cleaning every few weeks, while less-used spaces can be cleaned monthly. Regular upkeep prevents buildup and makes each cleaning session easier.
Benefits of Proper Tile and Grout Cleaning
Keeping up with tile and grout cleaning does more than just improve how your floors or walls look—it directly impacts the cleanliness, durability, and overall feel of your space. When grout is left untreated, it becomes a breeding ground for bacteria, mold, and trapped dirt, which not only affects appearance but can also impact indoor hygiene.
Regular cleaning helps restore the natural color of grout lines and brings back the shine of your tiles, making the entire area look fresher and well-maintained. It also prevents long-term damage caused by moisture and buildup, which can weaken grout over time.
Here are some key benefits to keep in mind:
- Improves appearance by making tiles look brighter and cleaner
- Enhances hygiene by removing bacteria, mold, and allergens
- Extends floor lifespan by preventing grout deterioration
- Reduces odors caused by trapped dirt and moisture
- Makes maintenance easier with less buildup over time
- Creates a healthier living environment for your home
When done regularly, tile and grout cleaning becomes less of a heavy task and more of a simple routine that keeps your space looking fresh, clean, and inviting.
FAQs
What is the best homemade grout cleaner?
A baking soda and water paste works well for regular cleaning and is safe for most surfaces.
Can I use vinegar for tile and grout cleaning?
Yes, but only on ceramic or porcelain tiles. Avoid using it on natural stone.
How long should grout cleaner sit?
Around 5–10 minutes is usually enough for effective results.
Is sealing grout necessary?
It’s optional but highly recommended for long-term protection.
Why is my grout still dirty after cleaning?
Deep stains may require repeated cleaning or a stronger grout cleaner.
Final Thoughts(Tile and grout cleaning)
Tile and grout cleaning becomes much easier when you follow a clear process. Preparing the area, using the right grout cleaners, scrubbing carefully, and finishing with proper rinsing and sealing can completely transform your space.
Consistency matters more than effort. Regular maintenance keeps grout from becoming heavily stained and reduces the need for deep cleaning. With the right approach, your tiles can stay bright, clean, and long-lasting without unnecessary stress.