

When embarking on a bathroom or kitchen renovation, one of the most common questions we encounter is: can you use silicone sealant over grout? Grout joints age, crack, discolor, or accumulate mold and mildew over time, leaving tiled surfaces looking tired and in need of repair. Many homeowners and DIY enthusiasts wonder if applying a bead of silicone sealant directly over existing grout is a viable shortcut to rejuvenate tiled areas. Based on our professional experience, the answer is yes—provided the application is done correctly and under the right circumstances. In this comprehensive, friendly, and easy-to-understand guide, we’ll share step-by-step instructions, expert tips, and real-world case studies to help you achieve a durable, waterproof, and aesthetically pleasing finish that outperforms traditional grout in spades.
Understanding the Basics: Why Silicone Over Grout?

Before diving into the how-to, let’s explore why choosing silicone can enhance the performance and longevity of your grout joints.
-
Enhanced Flexibility
Traditional cement-based grout cures to a rigid finish that can crack under tile movement, thermal expansion, or building settling. Silicone sealant, by contrast, remains flexible for years, accommodating slight shifts without splitting or losing adhesion. In areas subjected to frequent temperature and moisture changes—showers, tubs, and kitchen backsplashes—this flexibility is a game-changer. -
Superior Water Resistance
Grout is porous and can absorb moisture, leading to staining or mold growth beneath the surface. Silicone, however, is inherently impermeable to water. When applied correctly, it forms a watertight barrier that prevents seepage into substrate layers, protecting walls, floors, and adjacent structures. -
Improved Mold and Mildew Resistance
Many modern silicone sealants include anti-microbial or mildew-resistant additives. These formulations inhibit fungal growth, keeping sealant joints cleaner and more sanitary—an especially important feature for family bathrooms and high-traffic kitchens. -
Aesthetic Renewal and Color Matching
Grout can yellow or discolor over time. Silicone sealants are available in a wide palette of colors—matching common grout shades or providing contrast accents. You can even choose clear silicone for a discreet seal that lets tile colors shine through. -
Time and Cost Savings
Removing and regrouting an entire tile area can be labor-intensive and messy. Applying silicone over sound grout takes a fraction of the time, requires fewer specialized tools, and minimizes disruption—ideal for quick weekend projects or rental property touch-ups.
When Not to Use Silicone Over Grout
Although silicone over grout offers many benefits, there are scenarios where it’s not recommended:
-
Severely Damaged Grout: If grout is crumbling, deeply cracked, or missing in places, remove and regrout before sealing. Silicone cannot structurally repair large voids.
-
Wide Joints Without Backer Rod: Joints wider than ¼ inch need a foam backer rod inserted first. Without a backer rod, silicone can adhere to three sides and stress-cure, leading to premature failure.
-
Epoxy or Specialty Grouts: Epoxy grouts are non-porous and chemically incompatible with standard silicone formulations. Use a manufacturer-recommended sealant instead.
-
High-Traffic Floors with Abrasive Wear: In areas like entryways where foot traffic and dirt abrasion are extreme, silicone edges may degrade faster. Traditional grout topped with a high-quality sealer might be more durable.
Anatomy of Silicone Sealant: Key Features to Look For
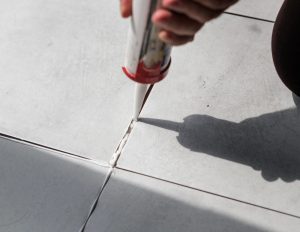
When shopping for the right product, keep an eye on these specifications:
-
Base Chemistry
-
Acetoxy Cure: Strong initial odor; superior adhesion to non-porous surfaces. Not suitable for natural stone due to potential staining.
-
Neutral (Oxime or Alkoxy) Cure: Low odor, non-corrosive and stone-safe. Preferred for bathrooms and kitchens.
-
-
Additives and Performance Claims
-
Mildew-Resistant: Contains biocides to inhibit fungal growth.
-
High UV Resistance: For exterior or sunlit areas to prevent yellowing.
-
Paintable Hybrid: Silicone-polymer blends that allow painting over sealant—rare but useful when matching wall paints.
-
-
Compliance and Certifications
-
ASTM C920 Rating: Indicates suitability for expansion and contraction cycles.
-
VOC Content: Low- or zero-VOC formulations for indoor air quality.
-
-
Color Options and Transparency
-
Choose colors that match or complement existing grout.
-
Use clear sealant only if grout is already in pristine condition and tile edges are uniform.
-
In-Depth Preparation: The Foundation of Success
Proper surface preparation can’t be overstated—it’s the difference between a seal that lasts five years versus one that fails in five months.
1. Comprehensive Cleaning
-
Mechanical Scrubbing: Use a stiff nylon brush or grout-specific scrub brush to remove embedded dirt, soap scum, and mildew.
-
Specialty Cleaners: Apply a pH-neutral tile cleaner or a mild bleach solution (1:10 bleach to water) for stubborn mold. Rinse thoroughly with clean water.
2. Removing Loose or Damaged Grout
-
Grout Saw or Rotary Tool: Undercut and remove any loose or cracked grout to a depth of at least 1/8 inch to ensure silicone can bond to solid material.
-
Vacuum Debris: After sawing, vacuum the joint to remove dust, chips, and moisture.
3. Surface Drying
-
Air Dry vs. Heat Gun: Allow joints to air dry for 24–48 hours in humid climates. For faster results in dry environments, a low-heat setting on a heat gun can help—but keep it moving to avoid tile damage.
4. Masking for Precision
-
High-Quality Painter’s Tape: Apply tape along both edges of the grout line, leaving a 2–3 mm gap for the silicone bead.
-
Test Placement: Press tile edges lightly to confirm tape adhesion; remove and reapply if paint or stone sealers resist adhesion.
Step-by-Step Application Guide
Step 1: Select and Prepare the Sealant Tube
-
Nozzle Cutting: Snip the nozzle at a 45° angle. Cut just enough to match the joint width—typically 2–3 mm for standard grout lines.
-
Puncture the Seal: Use a long nail or the built-in puncture tool on your caulk gun to pierce the inner seal.
Step 2: Load and Test the Caulk Gun
-
Consistent Pressure: Squeeze the trigger until a small bead emerges. Practice on scrap material to ensure smooth flow and control.
Step 3: Applying the Silicone
-
Steady Movement: Hold the gun at a 45° angle, pushing the nozzle forward while pulling the gun backward. Aim for an even, continuous bead.
-
Overlap Technique: For long runs, slightly overlap each new bead with the previous one by 2–3 cm to maintain continuity.
Step 4: Tooling the Bead
-
Timing Is Crucial: Tool the sealant within 5–10 minutes of application, before surface skin forms.
-
Tooling Methods:
-
Finger with Soapy Water: Dip your finger in a mild dish soap solution and glide along the bead for a smooth finish.
-
Silicone Finishing Tool: Provides a uniform shape; available in convex or concave profiles for different joint geometries.
-
Step 5: Tape Removal and Cleanup
-
Peel Immediately: Remove painter’s tape at a 45° angle while the sealant is still wet for crisp edges.
-
Wipe Excess: Use a damp cloth or baby wipe to remove stray smudges. Avoid solvent-based cleaners that may attack the sealant.
Step 6: Curing and Final Inspection
-
Light Use Timing: Wait at least 24 hours before exposing joints to splashes.
-
Full Cure: Allow 48–72 hours for complete chemical cure, especially in cool or humid environments.
-
Quality Check: Inspect for pinholes, voids, or adhesion gaps. Touch up immediately if any are found.
Advanced Tips and Professional Tricks
-
Backer Rod Installation for Wide Gaps
For joints over ¼ inch wide, insert a closed-cell foam backer rod before sealing. This controls bead depth, prevents three-sided adhesion, and reduces silicone consumption. -
Temperature and Humidity Control
Ideal application conditions are between 40°F and 95°F with relative humidity below 70%. Avoid extreme temperatures and direct sun during cure. -
Edge Sealing vs. Joint Sealing
-
Edge Sealing: Where tile meets fixtures or countertops, use a slightly larger nozzle cut for a more generous bead.
-
Joint Sealing: For grout lines, use a finer bead for subtle blending.
-
-
Preventing Staining on Porous Stone
When working with marble, travertine, or limestone, apply a thin layer of masking fluid along the joint edges. Peel off after tooling to protect stone surfaces. -
Color Matching and Recoloring
For grout discoloration issues, consider using a grout refresher pen before applying clear silicone. This evens out color variation underneath the sealant.
Case Studies: Real-World Applications
Case Study 1: Residential Shower Remodel
Our team was tasked with refreshing a 12-year-old master bathroom shower. Original grout was cracked and stained. We:
-
Removed loose grout to a 1/8-inch depth.
-
Cleaned joints with a bleach solution, rinsed, and dried for 48 hours under dehumidified conditions.
-
Applied clear, mildew-resistant neutral-cure silicone, tooling with a concave finishing tool.
Result: A crisp, seamless finish that remained mold-free and watertight for over five years before any touch-up was needed.
Case Study 2: Commercial Kitchen Backsplash
A local café wanted to quickly update its tile backsplash without downtime. We:
-
Masked adjacent painted walls and stainless-steel countertops.
-
Used colored silicone sealant matching the original grout tone.
-
Completed the job in just two hours, allowing the café to reopen by lunchtime.
Outcome: The café reported no water seepage or discoloration after two busy years of daily cleaning and high humidity.
Maintenance and Longevity Strategies
-
Weekly Wipe-Downs: Use a pH-neutral cleaner or mild dish soap to gently clean sealed joints.
-
Annual Inspection: Check for any shrinkage or adhesion loss. Plan a touch-up or reapplication within the same week to prevent moisture intrusion.
-
Adequate Ventilation: Install or use existing exhaust fans in bathrooms and kitchens to reduce humidity peaks that can stress sealant bonds.
-
Avoid Harsh Chemicals: Steer clear of acidic cleaners (vinegar, ammonia) that may degrade silicone over time.
Frequently Asked Questions (FAQ’S)
Q1. Can You Paint Over Silicone Sealant?
Most silicones resist paint adhesion. If painting is essential, use a silicone-compatible primer or choose a paintable hybrid sealant designed for this purpose.
Q2. Is Clear Silicone as Durable as Colored?
Yes—clear and colored neutral-cure silicones share the same base chemistry. Colored options simply include pigments without sacrificing performance.
Q3.How Long Should Silicone Last Over Grout?
With proper prep and maintenance, expect 5–10 years of service in interior, low-to-moderate traffic applications.
Q4. Can I Use Silicone Over Painted Walls Where Tiles Meet Drywall?
Yes, but only if the paint is fully cured and clean. Test adhesion in a hidden spot first to avoid peeling.
Q5. What’s the Difference Between Silicone and Acrylic Caulk?
Acrylic caulk is paintable but less flexible and water-resistant. Silicone excels in wet areas and expansion joints, while acrylic is suited for dry, interior trim.
Environmental and Safety Considerations
-
Low-VOC Formulas: Select silicone sealants labeled “Low VOC” or “Zero VOC” to minimize indoor air pollution.
-
Proper Disposal: Cured silicone is inert; uncured tubes and residue should be disposed of per local hazardous-waste guidelines.
-
Personal Protective Equipment: Always wear nitrile gloves and eye protection when tooling and cleaning uncured sealant.
Final Thoughts
In our extensive professional experience, using silicone sealant over grout is an efficient, cost-effective method to breathe new life into tiled spaces. When you follow rigorous preparation steps, select the right product, and adhere to proper application techniques, you’ll achieve a seal that is flexible, watertight, and visually appealing for years to come. Whether you’re a seasoned DIYer or hiring a pro, this approach minimizes downtime, reduces mess, and delivers a crisp finish that protects your home investment.